> ## Documentation Index
> Fetch the complete documentation index at: https://support.echotm.com/llms.txt
> Use this file to discover all available pages before exploring further.
# Echo ATS-BT Quick Start Guide
> Get your ATS-BT Bluetooth module up and running in minutes with this comprehensive guide
## Quick Navigation
Connect your ATS-BT module
Configure without the terminal
Set up your serial connection
Test basic functionality
Connect A2DP and LE Audio devices
Complete command guide
## Overview
The ATS-BT (Acoustic Test System - Bluetooth) module is a Bluetooth communication module controlled through simple text commands. Send commands over a serial connection, and the module handles all the Bluetooth complexity for you. Perfect for acoustic testing, audio development, and test automation.
The ATS-BT module features S/PDIF digital I/O with connectivity through micro BNC ports. It can run stand-alone and will connect to any S/PDIF capable interface.
The ATS-BT utilizes the IDC777 Bluetooth module from [IOT747](https://www.iot747.com/), providing advanced Bluetooth 5.4 capabilities including LE Audio (LC3 codec with Auracast and Unicast) and Classic Bluetooth with aptX support.
For detailed IDC777 technical specifications and documentation, visit the [IOT747 documentation page](https://www.iot747.com/documents/).
## Hardware Setup
*Figure 1: ATS-BT Module Front and Rear Views*
### Connection Steps
Connect a USB Type-C cable from the ATS-BT module to your host computer. The module is powered via USB - no external power supply needed.
Connect the **OUTPUT** of the BT module to the **INPUT** on your ATS or S/PDIF interface.
Connect the **INPUT** of the BT module to the **OUTPUT** on your ATS or S/PDIF interface.
The TX/RX swap is intentional — the module receives what you transmit and vice versa.
*Figure 2: ATS rear view showing where ATS-BT connects*
**Mounting:** The ATS-BT includes mounting holes for secure installation. See the [mounting holes drawing](https://github.com/parkermbrandon/mintlify-docs/releases/download/v1.0.4/ATS-BT.mounting.holes.pdf) for dimensions and hole positions.
### LED Status Indicators
| LED State | Status | Description |
| :----------------- | :------------- | :----------------------------- |
| **Solid White** | Initializing | Module is starting up |
| **Rapid Blinking** | Pairing Mode | Ready to pair with devices |
| **Slow Blinking** | Connected/Idle | Bluetooth connected or waiting |
| **Off** | No Power/Idle | Check USB connection |
## Configure with the ATS-BT Console
The fastest way to set up the ATS-BT is the free **ATS-BT Console** app for
Windows. It connects over the same USB cable and replaces the terminal
workflow below — configure everything point-and-click, no UART commands
required:
* **Switch device roles** — Audio Sink, Audio Source, LE Audio, and Auracast broadcast
* **Scan and pair** — discover nearby Classic and LE Audio devices and pair them
* **Monitor live links** — watch connection state and audio streams in real time
* **Built-in command console** — drop down to raw UART commands whenever you want
*Figure 3: ATS-BT Console dashboard*
Grab the Windows installer from the Software Downloads page.
The rest of this guide covers the UART command route — the right choice for
automation, scripting, or macOS/Linux hosts. The ATS-BT Console is
Windows-only.
## Terminal Configuration
### Windows Setup with PuTTY
Download PuTTY from [putty.org](https://www.putty.org/index.html) if you don't have it already.
Open Device Manager (press Windows+X, then M) and look under "Ports (COM & LPT)".
Note your COM port number (e.g., COM3 or COM4) - it will be listed as "USB Serial Device".
Open PuTTY and configure:
* Connection type: **Serial**
* Serial line: Your COM port (e.g., COM3)
* Speed: **115200**
* Click **Open**
For the best user experience, configure these terminal settings as shown in Figure 4 below
* **Local echo**: Force on (so you can see what you type)
* **Implicit CR in every LF**: On (proper line endings)
* **Implicit LF in every CR**: On (proper line endings)
*Figure 4: PuTTY terminal configuration*
To save your configuration:
1. Enter all settings (Serial, COM port, 115200 baud)
2. Type "ATS-BT" in "Saved Sessions"
3. Click "Save"
Next time, just double-click "ATS-BT" from the saved sessions list.
### macOS/Linux Terminal Setup
Open Terminal and run:
```bash theme={null}
ls /dev/tty.usb* # macOS
ls /dev/ttyUSB* # Linux
```
Note your device path (e.g., `/dev/tty.usbserial-1420` or `/dev/ttyUSB0`)
Use the built-in `screen` command:
```bash theme={null}
screen /dev/tty.usbserial-1420 115200
```
Replace with your actual device path.
To exit screen when done:
* Press `Ctrl+A` then `K`
* Confirm with `Y`
**Alternative Tools:**
* **minicom**: `minicom -D /dev/ttyUSB0 -b 115200`
* **picocom**: `picocom -b 115200 /dev/ttyUSB0`
* **CoolTerm**: GUI application for macOS
### Hercules Terminal (Windows)
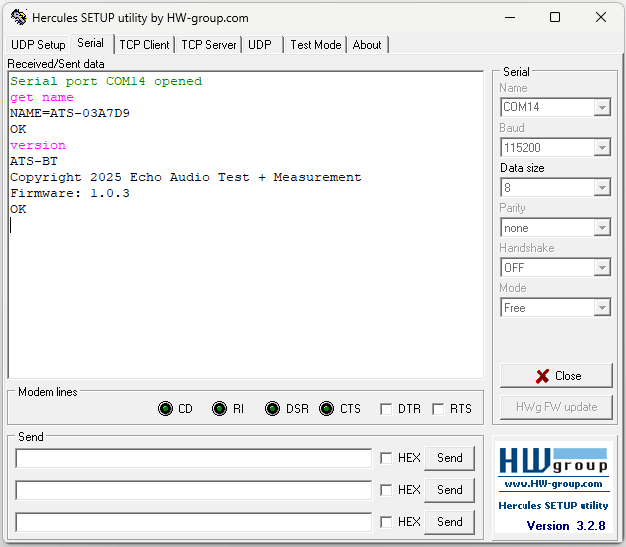
Hercules provides macro support for automated testing.
Download from [HW-group.com](https://www.hw-group.com/software/hercules-setup-utility)
* Select your COM port
* Set baud rate to **115200**
* Data bits: 8, Stop bits: 1, Parity: None
* Click **Open**
Use the macro feature to save common command sequences for quick testing.
*Hercules terminal with macro support*
## Essential Commands
Now let's verify your module is working correctly. Commands are case-insensitive.
### Basic Module Information
```bash Command theme={null}
VERSION
```
```text Response theme={null}
ATS-BT
Copyright 2025 Echo Audio Test + Measurement
Firmware: 1.0.3
```
### Get Bluetooth Address
```bash Command theme={null}
GET LOCAL_ADDR
```
```text Response theme={null}
LOCAL_ADDR=112233445566
OK
```
### View Configuration
```bash Command theme={null}
CONFIG
```
```text Response theme={null}
[Shows all current settings including device name, audio config, and features]
OK
```
### Scan for Classic Bluetooth
```bash Command theme={null}
INQUIRY 10
```
```text Response theme={null}
PENDING
INQUIRY 001122334455 "iPhone" 2C0404 -45 dBm
INQUIRY AABBCCDDEEFF "Galaxy Buds" 2C0404 -62 dBm
OK
```
**Understanding the response:**
* **Address**: 12-character Bluetooth address (001122334455)
* **Name**: Device name in quotes ("iPhone")
* **CoD**: Class of Device (2C0404)
* **RSSI**: Signal strength in dBm (-45) - closer to 0 is stronger
### Scan for BLE Devices
```bash Command theme={null}
SCAN 5 OFF 3
```
```text Response theme={null}
PENDING
SCAN 3 AABBCCDDEEFF 0 0x3 -48
OK
```
**Scan filters:**
* `0`: No filter (all devices)
* `2`: LE Auracast Broadcasters
* `3`: LE Unicast Receivers
### Connection Status
```bash Command theme={null}
STATUS
```
```text Response theme={null}
STATE CONNECTABLE[ON] DISCOVERABLE[ON] ADVERTISING[ON]
SCAN_UNI[OFF] AUTOCONN[OFF] OPENANY[OFF]
```
| Flag | Meaning | Typical State |
| :----------- | :---------------------------- | :------------- |
| CONNECTABLE | Accepts incoming connections | ON |
| DISCOVERABLE | Visible to other devices | ON |
| ADVERTISING | Broadcasting BLE availability | ON |
| SCAN\_UNI | Unicast scanning | OFF |
| AUTOCONN | Auto-reconnect to paired | OFF |
| OPENANY | Accept any connection | OFF (security) |
### List Paired Devices
```bash Command theme={null}
LIST
```
```text Response theme={null}
001122334455 "iPhone"
AABBCCDDEEFF "Galaxy Buds"
OK
```
**Success!** If you see proper responses to these commands, your ATS-BT module is working correctly and ready for Bluetooth connections.
## Transmit and Receive Modes
The ATS-BT can operate as an audio **transmitter** or a **receiver**, but not both at the same time. The direction is set by the `PROFILES` configuration, and the module must be in the correct mode *before* you open an audio stream.
ATS-BT **sends** audio out over Bluetooth — e.g. streaming its S/PDIF input to earbuds or a phone using LE Audio (`OPEN ... UTX`) or A2DP source.
```bash theme={null}
SET PROFILES=ON 0 1 0 1 1 1 1
WRITE
RESET
```
ATS-BT **receives** audio from a phone or other source and plays it out on S/PDIF (A2DP sink). This is the factory default.
```bash theme={null}
SET PROFILES=ON 1 0 1 0 1 1 1
WRITE
RESET
```
A `PROFILES` change only takes effect after `WRITE` followed by `RESET`. Check the current mode any time with `CONFIG` and read the `PROFILES=` line.
## Bluetooth Connections
### Connecting to Classic Bluetooth Devices
Perfect for headphones, speakers, and traditional Bluetooth audio devices.
Enable pairing mode on your headphones/speaker (usually holding the power button).
```bash theme={null}
INQUIRY 5
```
Note the address of your device from the results.
```bash Command theme={null}
PAIR 001122334455
```
```text Response theme={null}
PENDING
PAIR_OK 0 001122334455
```
```bash Command theme={null}
OPEN 001122334455 A2DP
```
```text Response theme={null}
PENDING
OPEN_OK 10 A2DP 001122334455
OPEN_OK 11 AVRCP 001122334455
ABS_VOL 11 59
```
**Link IDs Explained:**
* **10**: A2DP audio stream (first digit = device, second = profile)
* **11**: AVRCP control channel
* Use these IDs for subsequent commands
```bash Command theme={null}
MUSIC 11 PLAY
```
```text Response theme={null}
OK
ABS_VOL 11 59
A2DP_STREAM_START 10
```
### Playback Control Commands
| Command | Description | Example |
| :-------------------- | :----------------- | :--------------- |
| MUSIC \ PLAY | Start playback | `MUSIC 11 PLAY` |
| MUSIC \ PAUSE | Pause playback | `MUSIC 11 PAUSE` |
| MUSIC \ STOP | Stop playback | `MUSIC 11 STOP` |
| VOLUME \ \ | Set volume (0-127) | `VOLUME 11 64` |
### Connecting to LE Audio Devices
For next-generation Bluetooth devices supporting LE Audio with LC3 codec.
`OPEN ... UTX` transmits audio **from** the ATS-BT, so the module must be in **transmit mode** first (`SET PROFILES=ON 0 1 0 1 1 1 1`, then `WRITE` and `RESET`). See [Transmit and Receive Modes](#transmit-and-receive-modes).
```bash Command theme={null}
SCAN 5 OFF 3
```
```text Response theme={null}
PENDING
SCAN 3 AABBCCDDEEFF 0 0x3 -48
OK
```
**Filter options:**
* `3`: LE Unicast Receivers (headphones/earbuds)
* `2`: LE Auracast Broadcasters
* `0`: All BLE devices
```bash Command theme={null}
PAIR_LE AABBCCDDEEFF 0
```
```text Response theme={null}
PENDING
PAIR_OK_LE AABBCCDDEEFF
```
**Address type parameter:**
* `0` — Public address (most LE Audio earbuds, e.g. Galaxy Buds 2 Pro)
* `1` — Private/random resolvable address (most modern smartphones using LE Privacy, e.g. Pixel 8+)
Check the address type column in your `SCAN` results to choose the right value. For example, `SCAN 3 AABBCCDDEEFF 0 0x3 -48` shows address type `0` (public), so use `PAIR_LE AABBCCDDEEFF 0`. If you see `0x1` instead, use `PAIR_LE AABBCCDDEEFF 1`.
The "PAIR\_OK\_LE" confirms successful Low Energy pairing. Omitting the address type returns `[BT Error] Wrong parameter`.
If your device is a set of earbuds, use SCAN\_RSI to find and pair the second earbud:
```bash Command theme={null}
SCAN_RSI 5 AABBCCDDEEFF 0
```
```text Response theme={null}
PENDING
SCAN_RSI FFEEDDCCBBAA
OK
```
Then pair the second earbud:
```bash Command theme={null}
PAIR_RSI FFEEDDCCBBAA
```
```text Response theme={null}
PENDING
PAIR_OK_LE FFEEDDCCBBAA
```
The `0` after the address is the address type (0 = public). The second earbud will auto-connect when you open a UTX stream to the first earbud.
```bash Command theme={null}
OPEN AABBCCDDEEFF BLE 0
```
```text Response theme={null}
PENDING
OPEN_OK 14 BLE AABBCCDDEEFF
```
The `0` after BLE is the address type (0 = public address).
```bash Command theme={null}
OPEN AABBCCDDEEFF UTX 0 0
```
```text Response theme={null}
PENDING
OPEN_OK 17 UTX AABBCCDDEEFF
LC3_MEDIA_START 17 SOURCE 8 CONTEXT 4
ABS_VOL 17 136
```
Audio streaming begins automatically when the UTX link opens — no separate MUSIC command is needed.
**UTX parameters:**
* First `0`: Address type (0 = public)
* Second `0`: Connection info — `0` for music, `1` for voice
**Stream types:**
* `UTX 0 0`: Unicast transmit (music)
* `UTX 0 1`: Unicast transmit (voice)
* `URXM`: Unicast receive (music)
* `URXV`: Unicast receive (voice)
To stop a UTX audio stream, close the link with `CLOSE ` (e.g., `CLOSE 14`).
```bash Command theme={null}
STATUS
```
```text Response theme={null}
STATE CONNECTABLE[ON] DISCOVERABLE[IDLE] ADVERTISING[ON]
LINK 14 CONNECTED BLE AABBCCDDEEFF MTU 250
LINK 17 CONNECTED UTX AABBCCDDEEFF STREAMING LC3 MEDIA
SNK_RATE 48000 SNK_SDU_INT 10000 SNK_SDU_SIZE 100
SNK_RTN 5 SNK_P_DELAY 40000 SNK_MAX_LAT 95
OK
```
### LC3 Stream Parameters
| Parameter | Value | Description |
| :------------- | :---- | :------------------- |
| SNK\_RATE | 48000 | 48kHz sample rate |
| SNK\_SDU\_INT | 10000 | 10ms packet interval |
| SNK\_SDU\_SIZE | 100 | 100 byte packets |
| SNK\_RTN | 5 | 5 retransmissions |
| SNK\_MAX\_LAT | 95 | 95ms max latency |
**Success!** Your BLE Audio stream is now active using the efficient LC3 codec!
## Command Reference
Shows all available commands
```bash theme={null}
HELP
```
Display firmware version
```bash theme={null}
VERSION
```
Shows current configuration
```bash theme={null}
CONFIG
```
Shows connection status
```bash theme={null}
STATUS
```
List paired devices
```bash theme={null}
LIST
```
Get module's Bluetooth address
```bash theme={null}
GET LOCAL_ADDR
```
Search for Classic Bluetooth devices
**Syntax:** `INQUIRY
Search for BLE devices
**Syntax:** `SCAN
Find the second earbud in a coordinated set
**Syntax:** `SCAN_RSI
Pair with a Classic Bluetooth device
**Syntax:** `PAIR `
**Example:**
```bash theme={null}
PAIR 001122334455
```
Pair with a Bluetooth Low Energy device (required before `OPEN UTX` LE Audio streaming)
**Syntax:** `PAIR_LE `
**Address types:**
* `0` — Public address (most LE Audio earbuds)
* `1` — Private/random resolvable address (most modern smartphones)
**Examples:**
```bash theme={null}
PAIR_LE AABBCCDDEEFF 0 # Galaxy Buds 2 Pro and similar earbuds
PAIR_LE 50C0F02093B6 1 # Pixel / Android phones using LE Privacy
```
The address type must match what `SCAN` reports for that device. Omitting it returns `[BT Error] Wrong parameter`.
Remove device from pair list
**Syntax:** `UNPAIR [bt_addr]`
**Examples:**
```bash theme={null}
UNPAIR 001122334455 # Specific device
UNPAIR # All devices
```
Pair with the second earbud found via SCAN\_RSI
**Syntax:** `PAIR_RSI `
**Example:**
```bash theme={null}
PAIR_RSI FFEEDDCCBBAA
```
Open profile connection
**Syntax:** `OPEN [addr_type] [connection_info]`
**Profiles:** A2DP, AVRCP, BLE, UTX, URXM, URXV, etc.
**Examples:**
```bash theme={null}
OPEN 001122334455 A2DP # Classic A2DP
OPEN AABBCCDDEEFF BLE 0 # BLE link (0=public addr)
OPEN AABBCCDDEEFF UTX 0 0 # Unicast music (0=music)
OPEN AABBCCDDEEFF UTX 0 1 # Unicast voice (1=voice)
```
Close connection
**Syntax:** `CLOSE `
**Example:**
```bash theme={null}
CLOSE 10
```
Set the module's operating direction. The IDC777 can be a transmitter **or** a receiver, not both at once.
**Syntax:** `SET PROFILES=ON `
**Common values:**
```bash theme={null}
SET PROFILES=ON 0 1 0 1 1 1 1 # Transmit (LE Audio UTX / A2DP source)
SET PROFILES=ON 1 0 1 0 1 1 1 # Receive (A2DP sink) — factory default
```
Follow any `PROFILES` change with `WRITE` then `RESET`. Do **not** enable both `a2dp_snk` and `a2dp_src` at the same time — it makes the module unstable and it will reset when a stream opens.
Control playback (Classic A2DP and Auracast only)
**Syntax:** `MUSIC `
**Actions:** PLAY, PAUSE, STOP
**Example:**
```bash theme={null}
MUSIC 11 PLAY
```
The MUSIC command works with A2DP, AVRCP, and Auracast (BRX1/BRX2) links. It does not apply to UTX unicast streams — those start audio automatically when the link opens. Use `CLOSE ` to stop a UTX stream.
Set volume level
**Syntax:** `VOLUME `
**Range:** 0-127
**Example:**
```bash theme={null}
VOLUME 11 64 # 50% volume
```
Contact Echo for info or support.
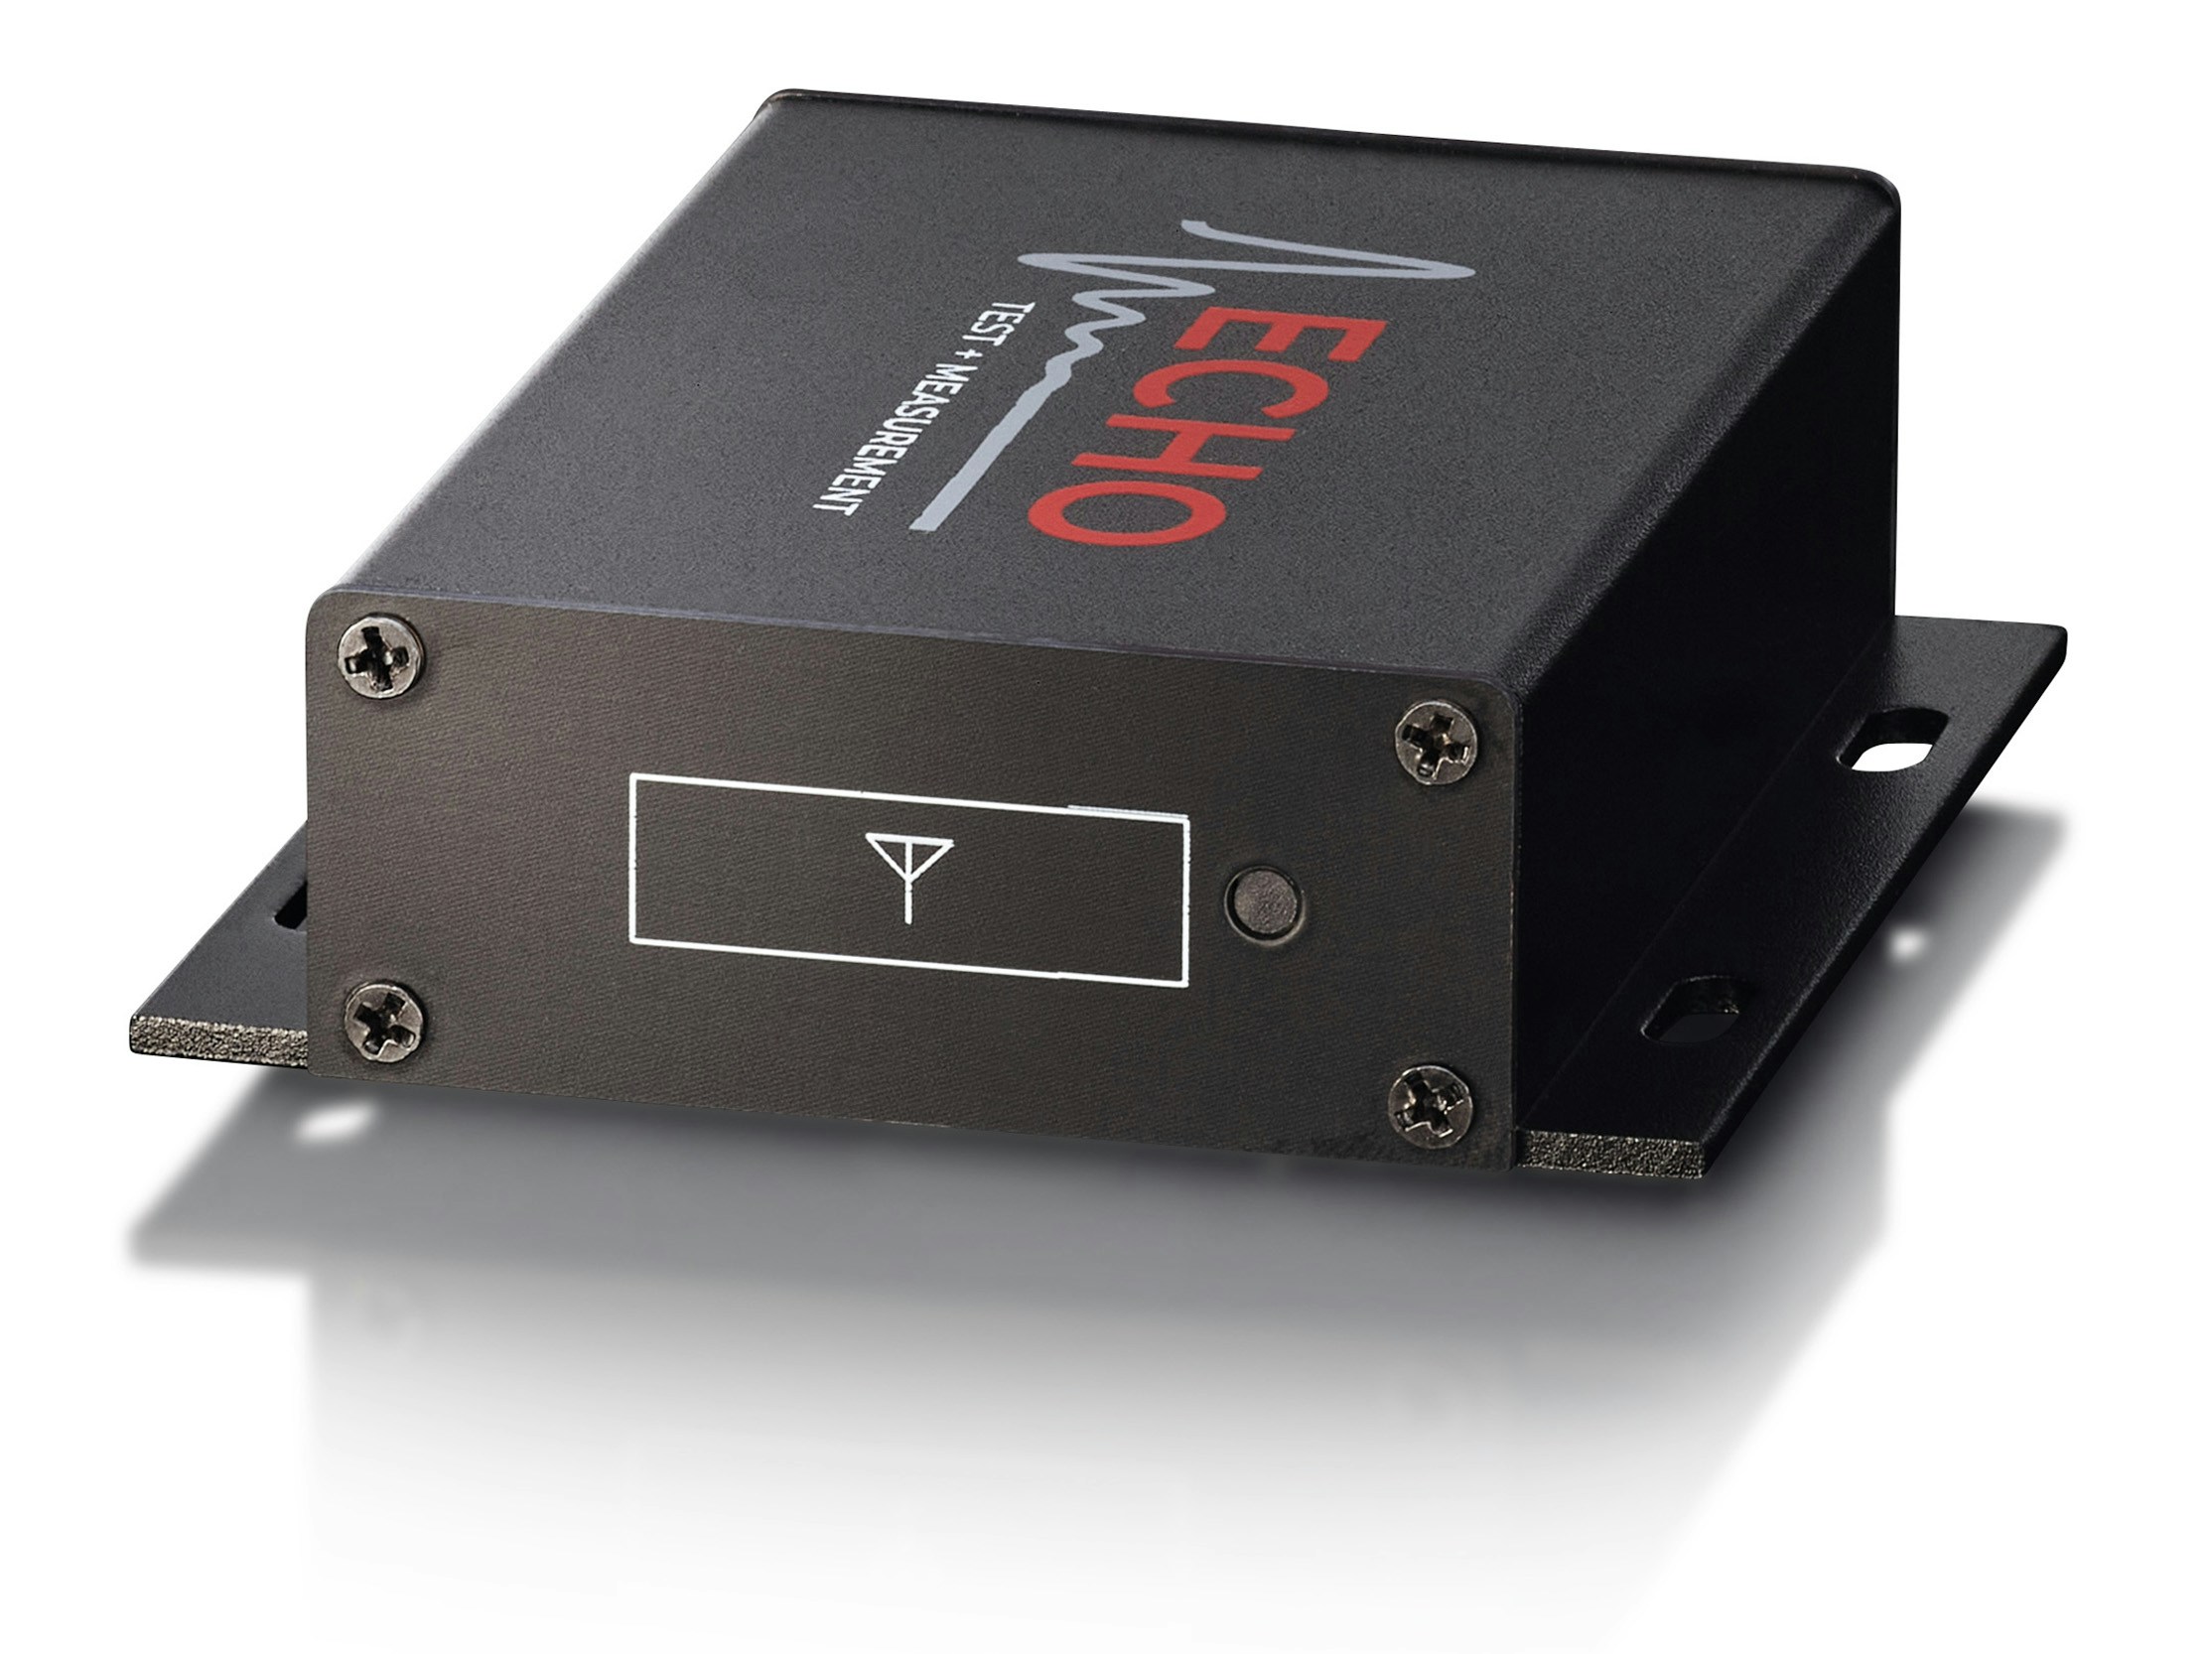
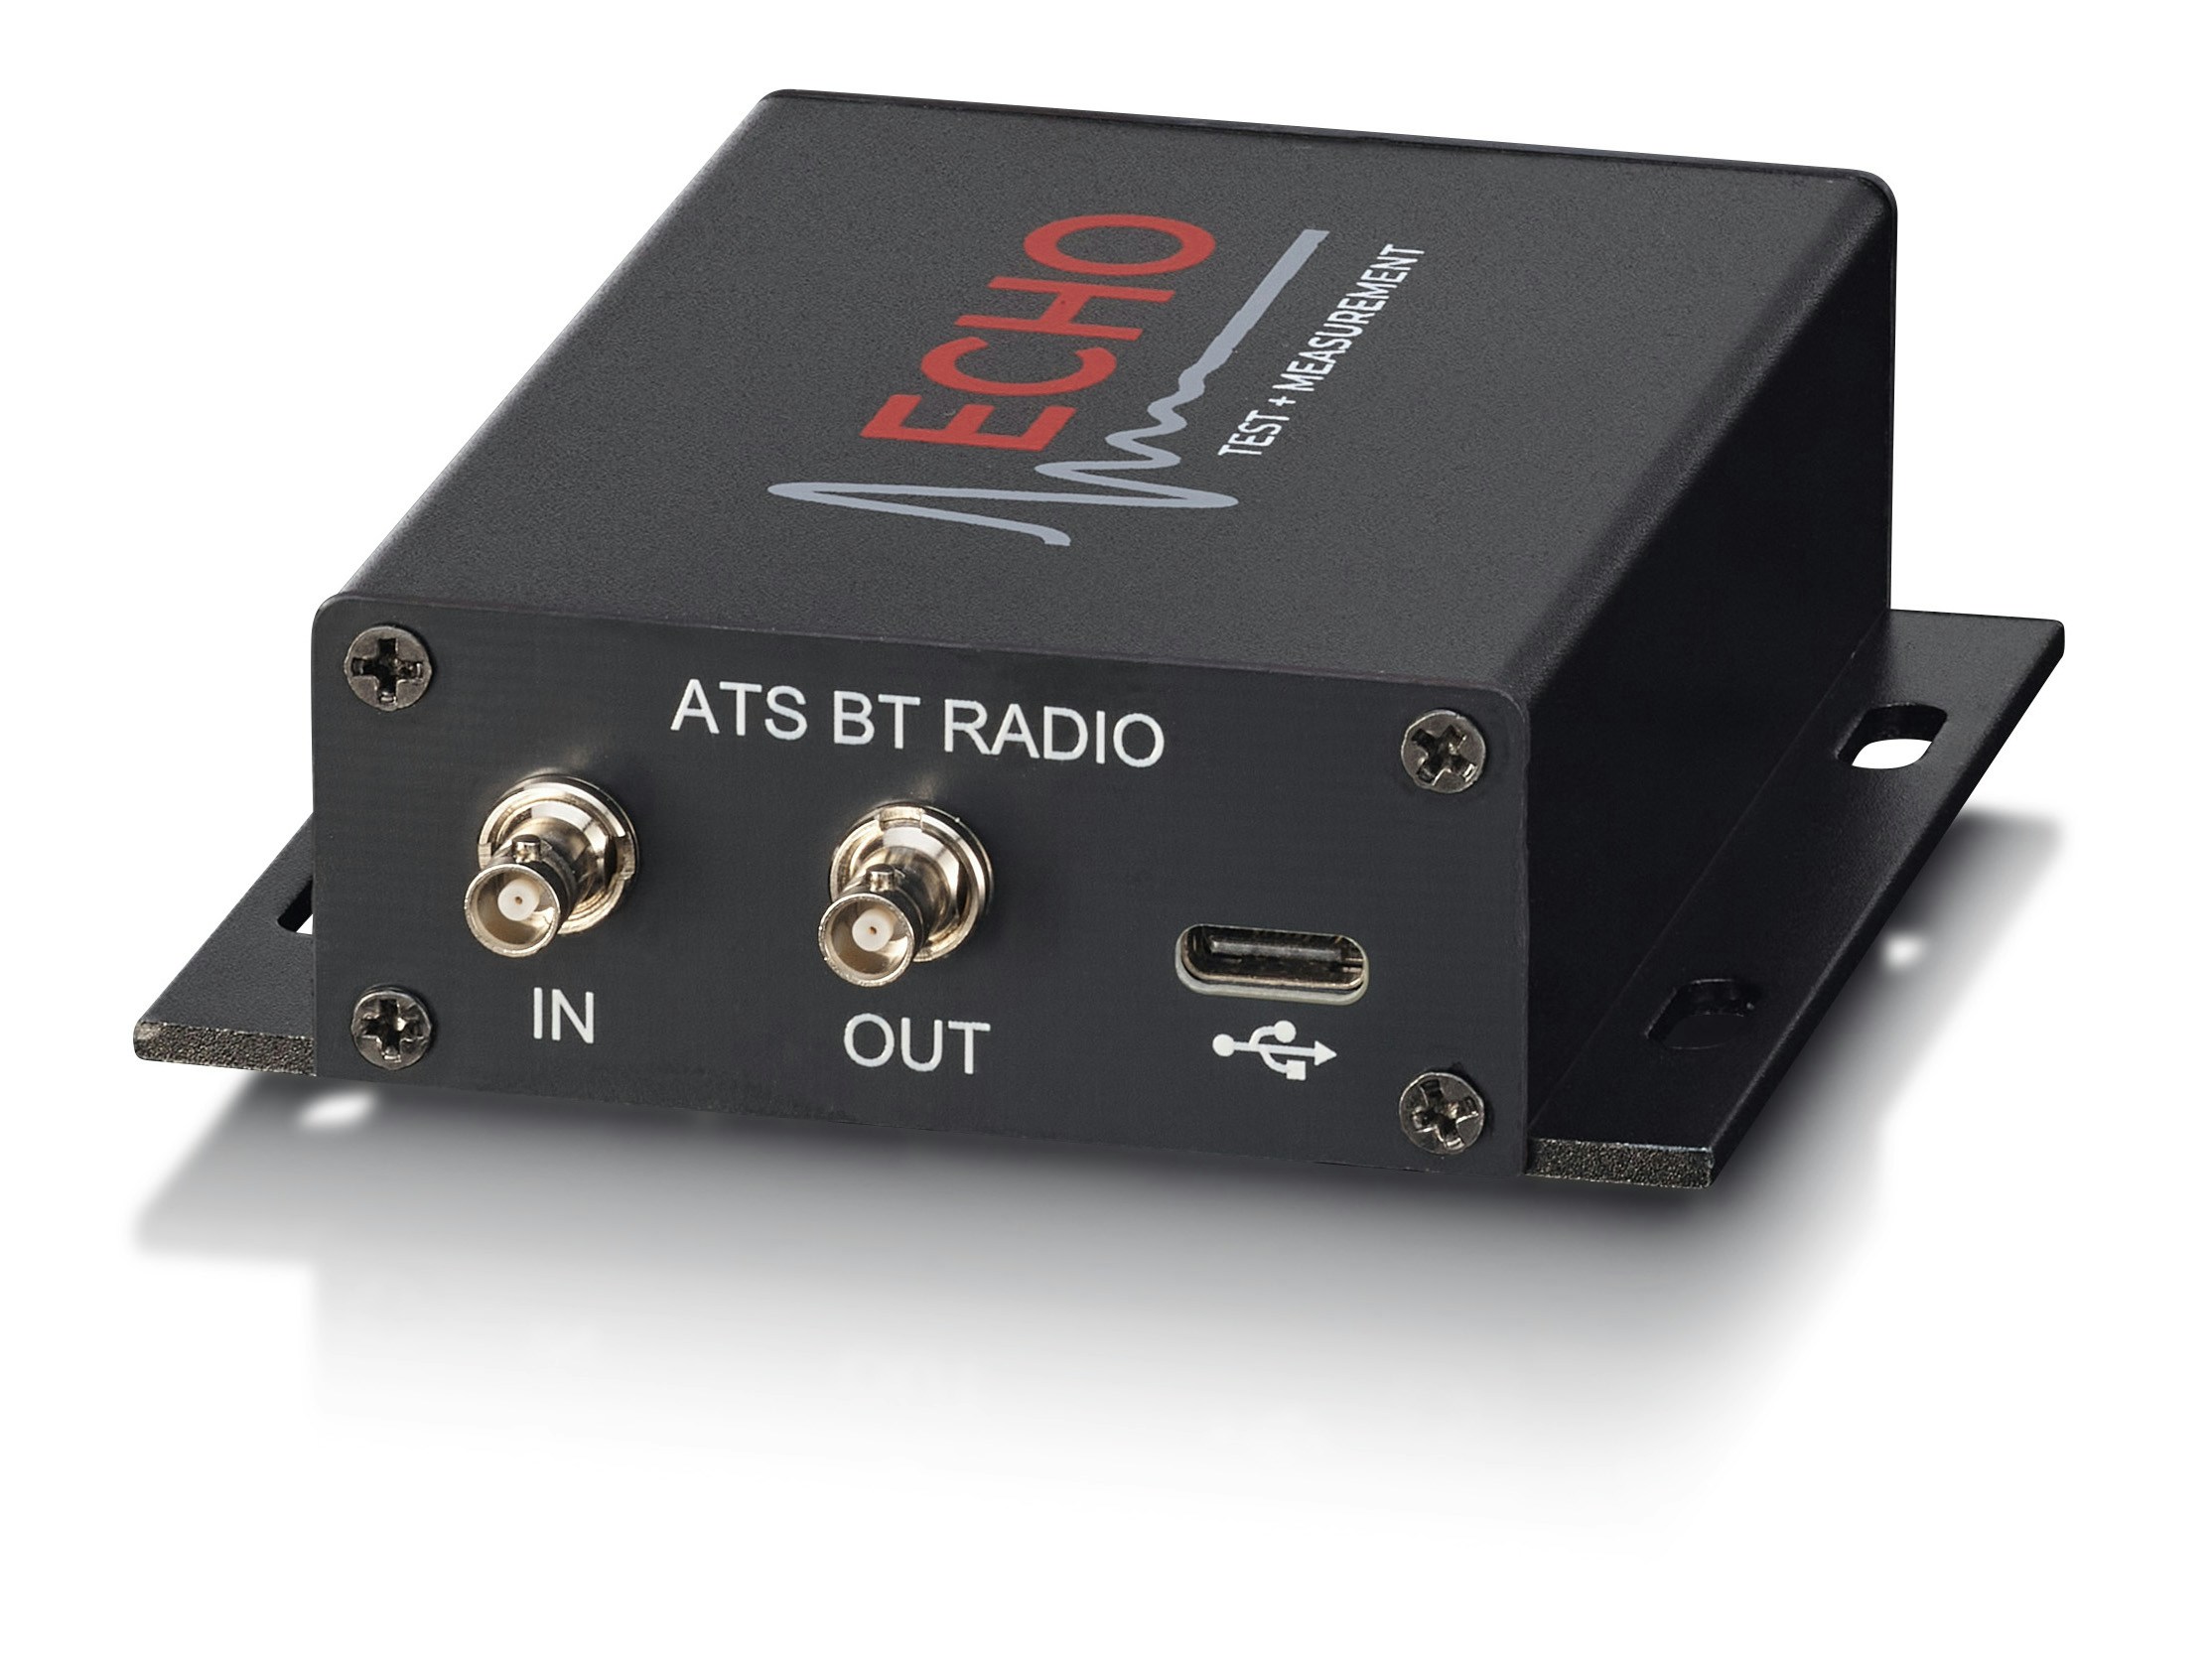
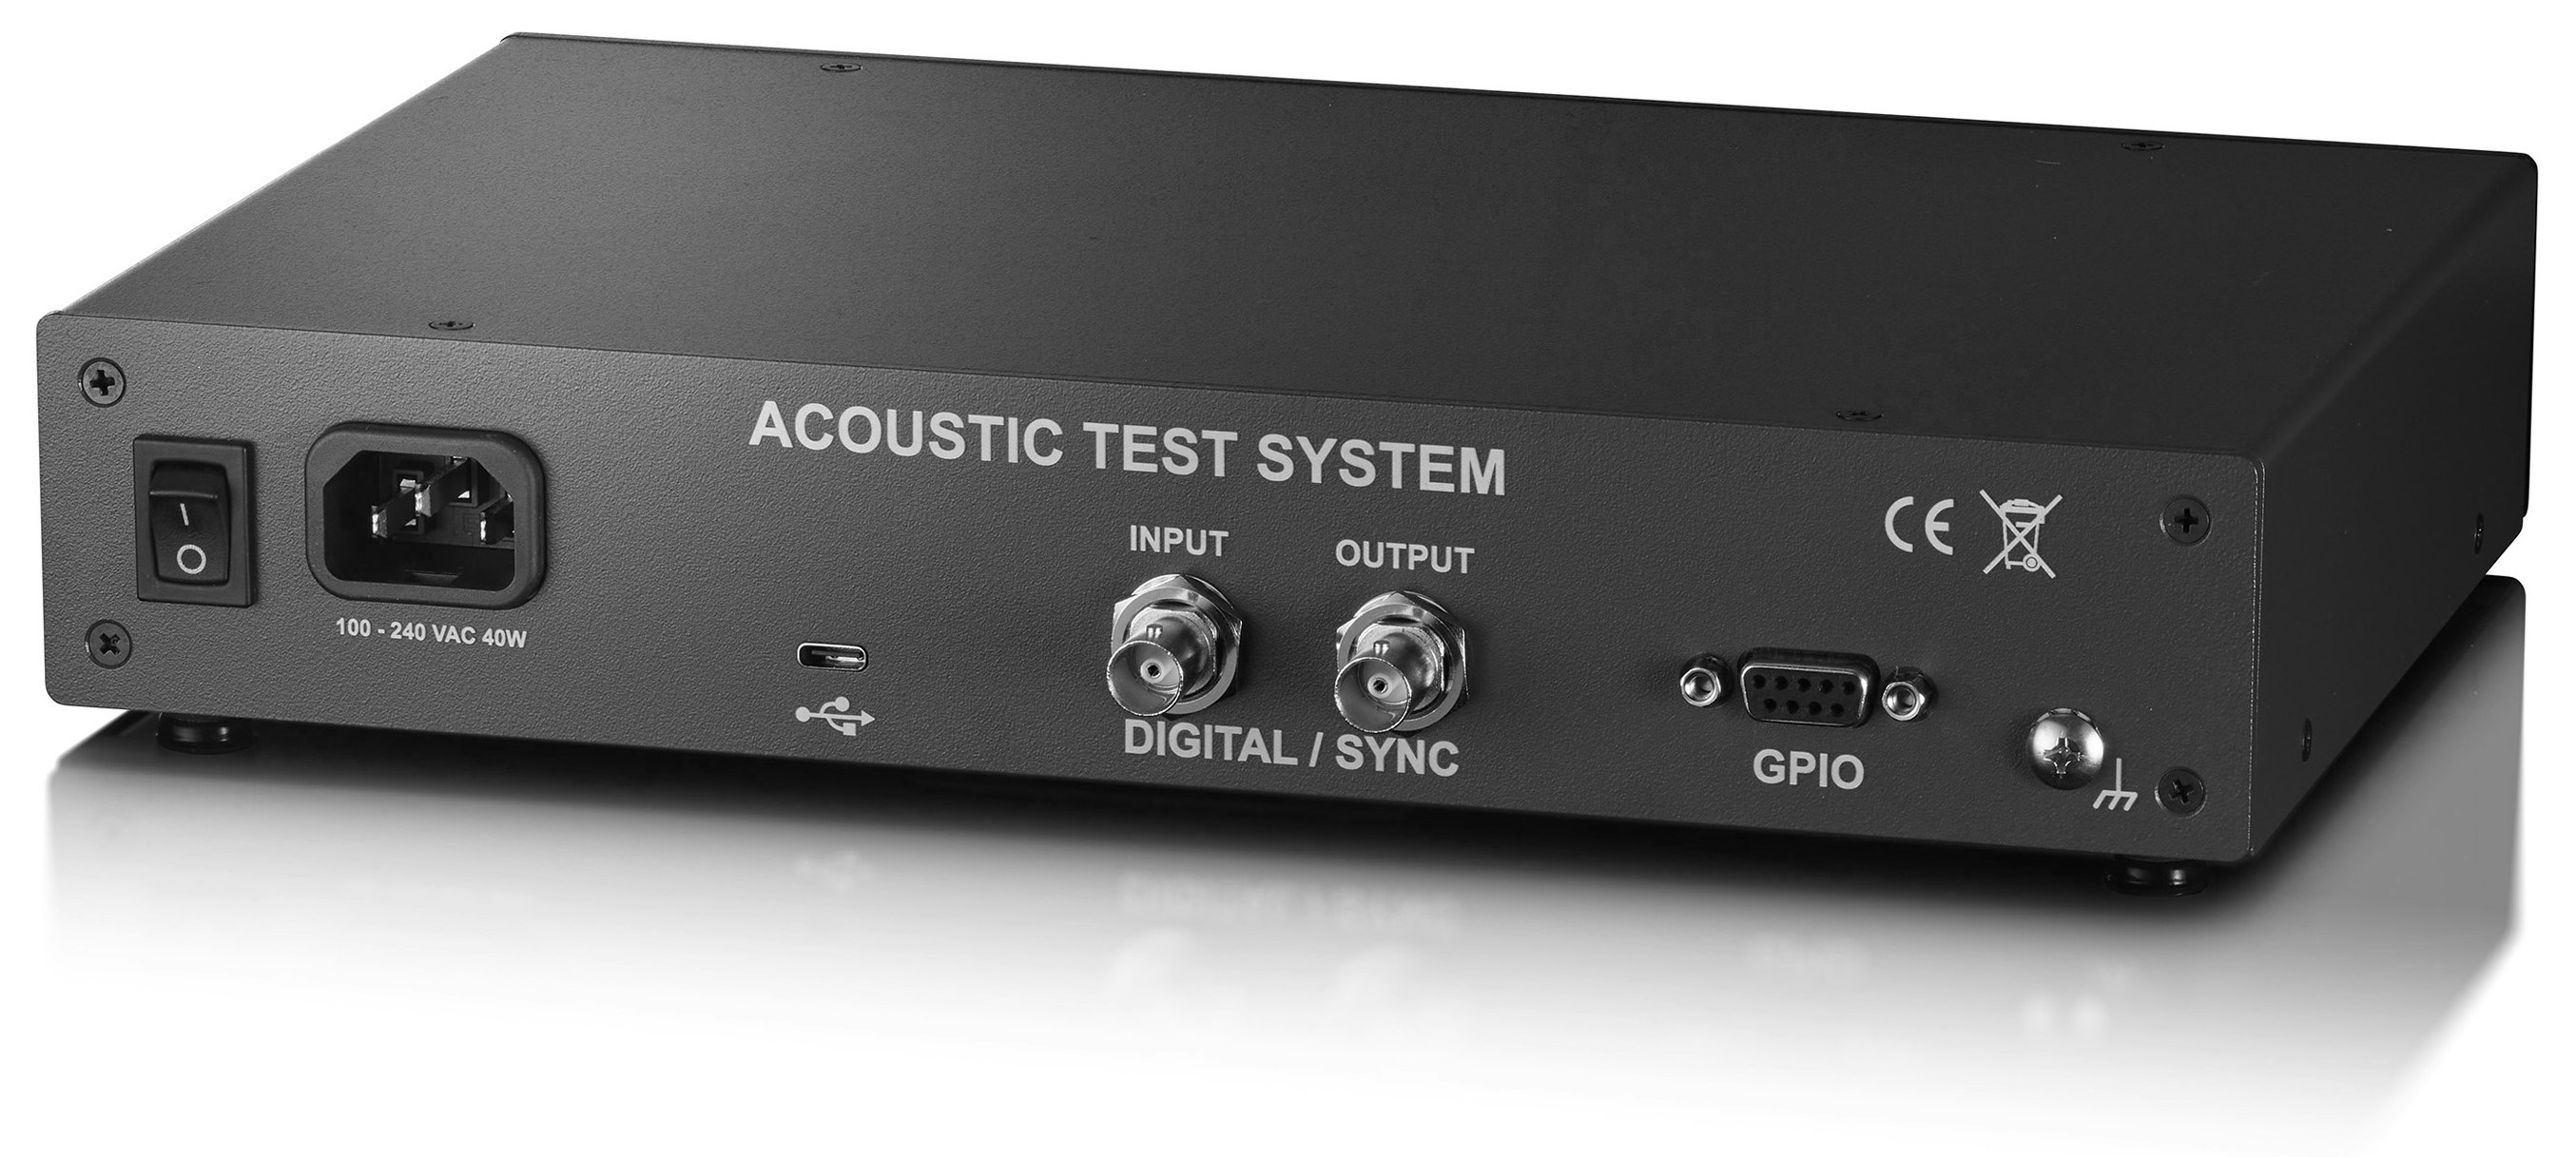 *Figure 2: ATS rear view showing where ATS-BT connects*
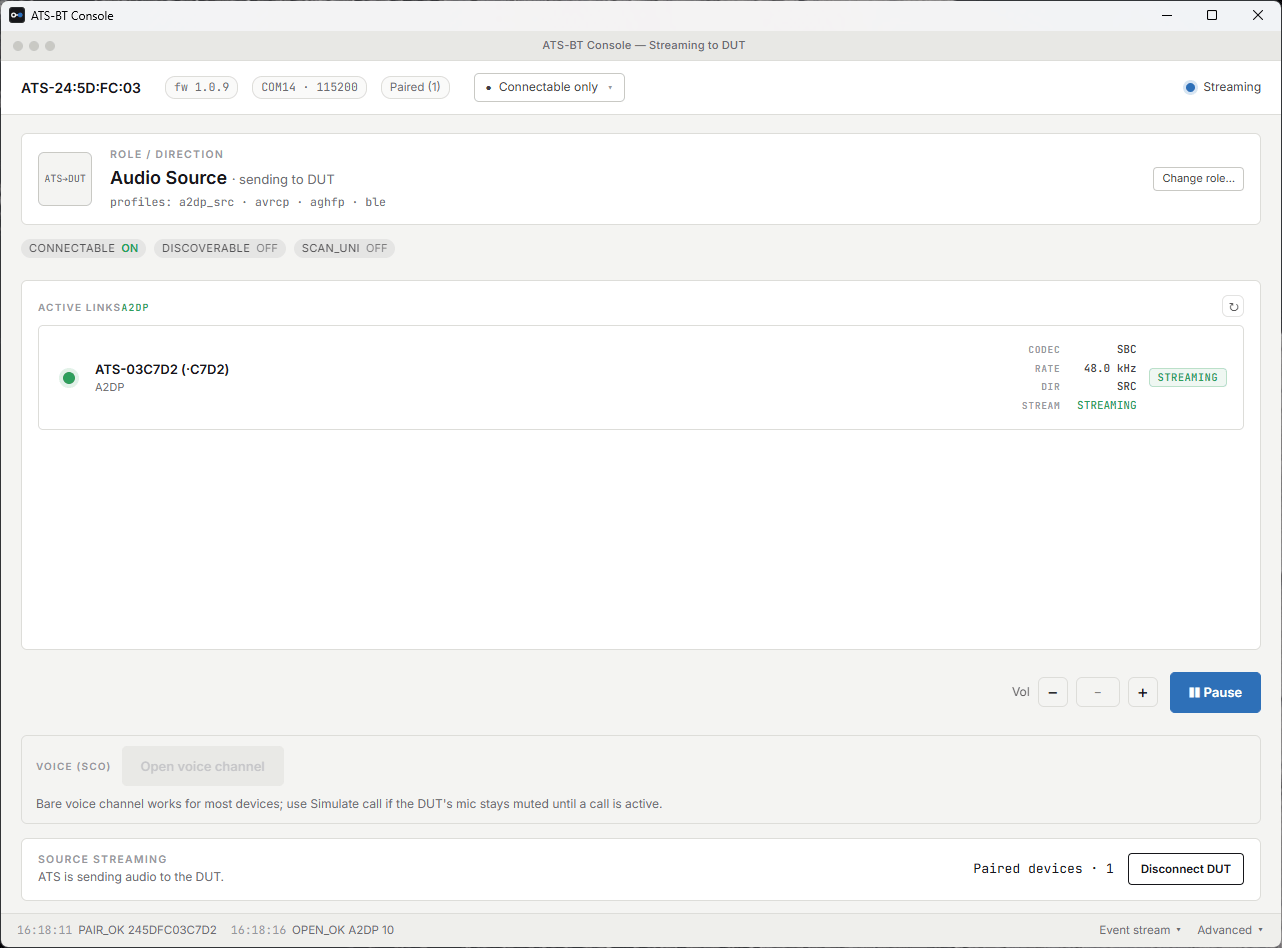 *Figure 3: ATS-BT Console dashboard*
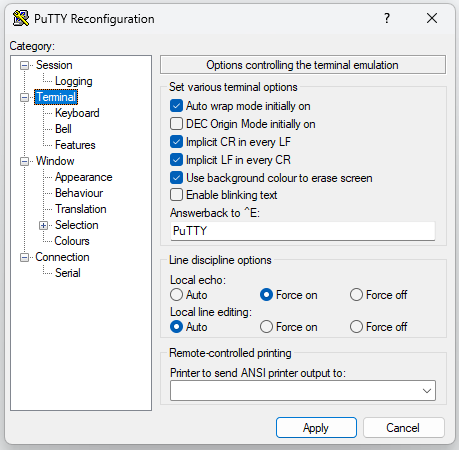 *Figure 4: PuTTY terminal configuration*
 *Hercules terminal with macro support*